🎮GPU Training
This tutorial shows how to train on Atari games using GPU acceleration.
Atari games are classic benchmarks for deep RL—image-based observations require ConvNet architectures that benefit significantly from GPU acceleration.
Why GPU for Atari?
The PPO Atari spec uses the Nature DQN ConvNet architecture:
Conv layers: [32×8×8, stride 4] → [64×4×4, stride 2] → [64×3×3, stride 1]
FC layer: 512 units
Total parameters: ~1.7M
This architecture processes 84×84 grayscale frames. The convolutional layers extract spatial features, making GPU acceleration beneficial due to parallel matrix operations.
GPU does not always accelerate your training. For vector-state environments like CartPole or LunarLander with small MLPs, the data transfer overhead exceeds the computation benefit. Use GPU only for image-based environments with ConvNets or large MLPs.
If you encounter CUDA driver issues, see Help for troubleshooting.
GPU Monitoring
nvidia-smi
Check GPU availability and memory:
Key metrics to watch:
GPU-Util: Should be 30-70% during training (higher for larger batches)
Memory-Usage: Atari typically uses 2-4GB per session
glances
For a prettier dashboard, use glances:
Checking PyTorch GPU Access
The Atari Spec
The PPO Atari spec from slm_lab/spec/benchmark/ppo/ppo_atari.json:
The key setting is "gpu": "auto" in the net spec.
GPU Options
"auto"
Use GPU if available, fallback to CPU
true
Force GPU (error if unavailable)
false
Force CPU only
0, 1, ...
Use specific GPU device
When to Use GPU
Atari (images)
ConvNet (~1.7M params)
High
MuJoCo (vectors)
MLP [256,256] (~200K params)
Moderate
CartPole (vectors)
Small MLP [64,64] (~5K params)
None - CPU is faster
Rule of thumb: Use GPU for ConvNets and MLPs with 256+ hidden units. For smaller networks, the data transfer overhead exceeds the computation benefit.
Choosing a GPU
VRAM is What Matters
For reinforcement learning, VRAM (GPU memory) is the primary constraint, not compute power. RL networks are small compared to large language models or image generation models:
Atari (ConvNet)
2-4 GB
Entry-level
MuJoCo (MLP)
0.5-1 GB
Entry-level
Large batch search
4-8 GB
Mid-range
Don't Overspend on GPUs
A common mistake is renting expensive GPUs (A100, H100) for standard RL workloads. These high-end GPUs are designed for:
Large language models (billions of parameters)
Large batch deep learning (thousands of samples)
Multi-GPU distributed training
For SLM Lab workloads, entry-level GPUs are sufficient:
L4
24 GB
~$0.40/hr
Excellent - handles all workloads
T4
16 GB
~$0.35/hr
Great - sufficient for most
RTX 3060
12 GB
~$0.30/hr
Good - works well
V100
16-32 GB
~$1.50/hr
Overkill for standard RL
A100
40-80 GB
~$3+/hr
Wasteful for RL
Cost-effective choice: The L4 GPU ($0.40/hr) handles all SLM Lab benchmarks comfortably. It's often cheaper than equivalent CPU instances due to fractional GPU sharing.
What Affects VRAM Usage
Batch size (
minibatch_size) - Larger batches use more memoryNetwork size - More parameters = more memory for weights and gradients
Parallel trials - Search mode with fractional GPU shares memory
Frame stacking - Atari stacks 4 frames, increasing input size
For more detailed GPU selection guidance and performance optimization, see Chapter 12 of Foundations of Deep Reinforcement Learning.
Running PPO on Qbert
You should see higher fps (frames per second) compared to CPU training. The trial takes a few hours to complete on a modern GPU.
Results
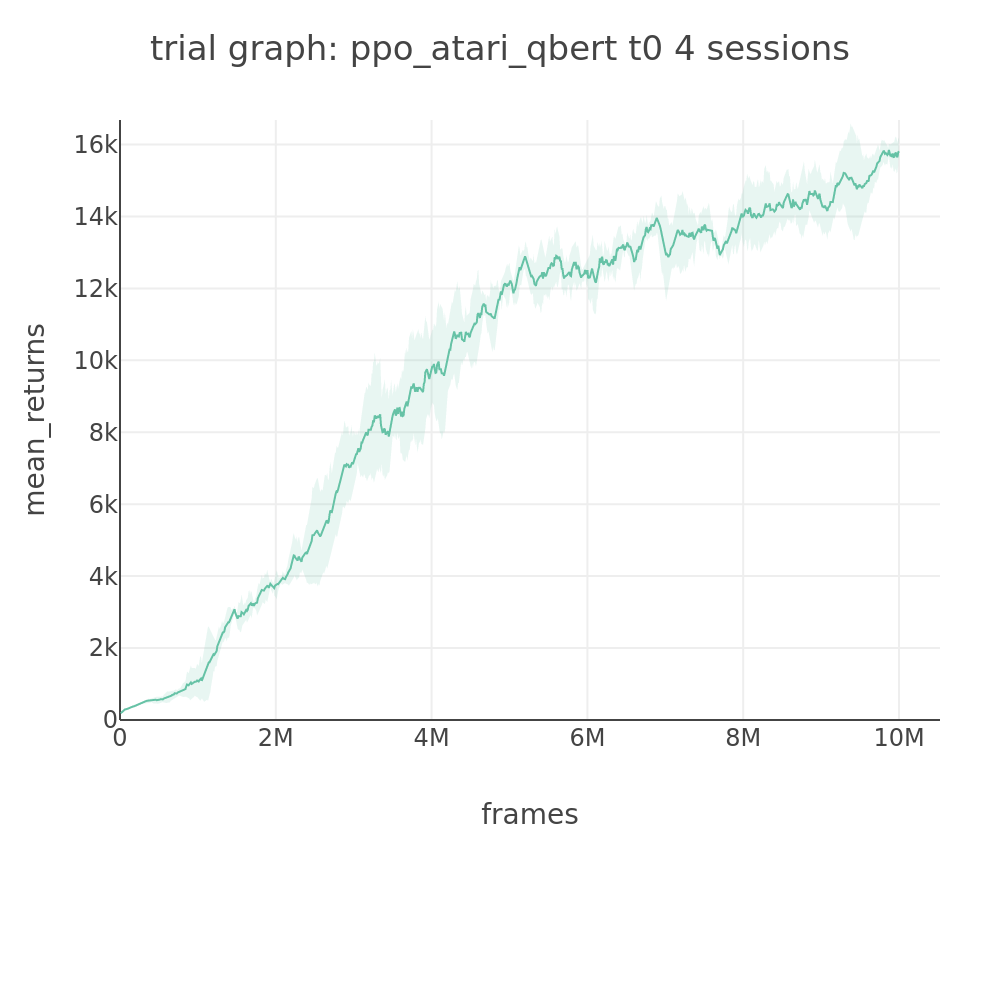
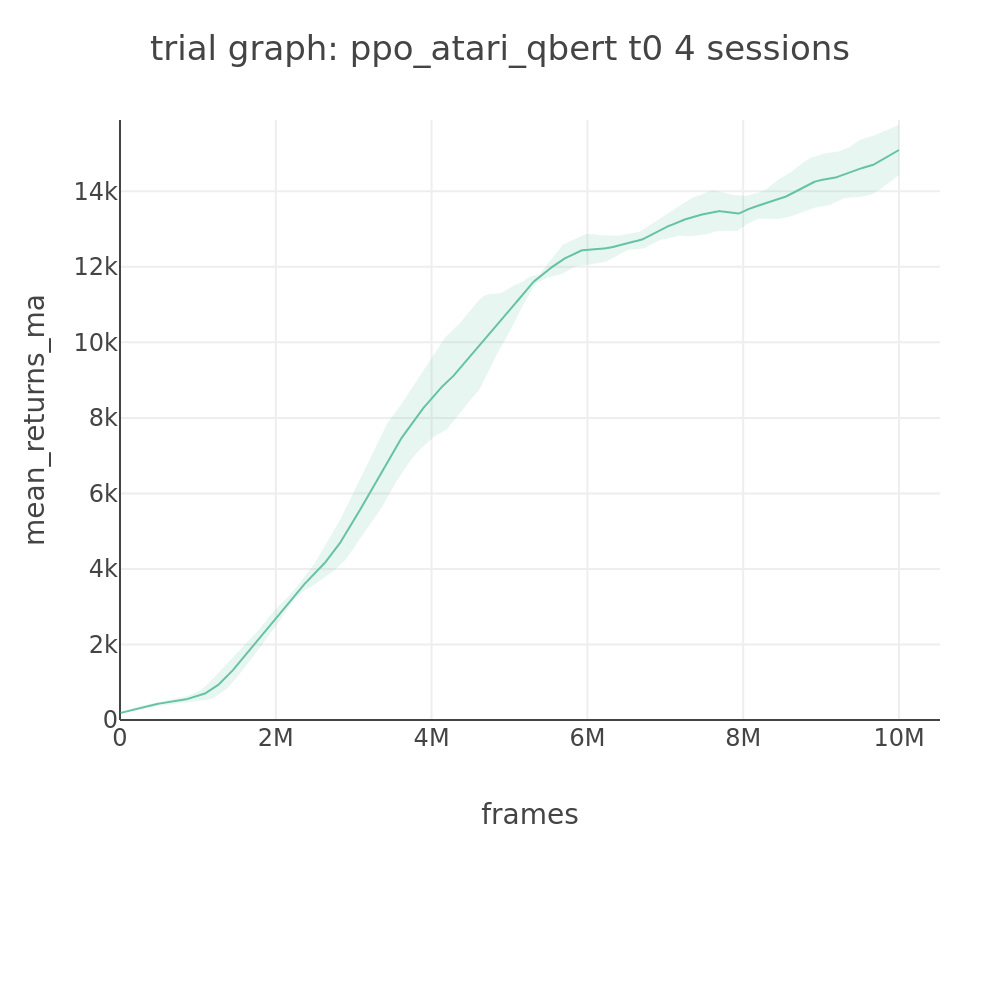
PPO achieves 15094 MA on Qbert-v5.
Training curve (average of 4 sessions):

Moving average (100-checkpoint window):

Trained models available on HuggingFace.
Other Atari Games
The same spec works for all 54 Atari games. Different games benefit from different lambda values:
Qbert
slm-lab run -s env=ALE/Qbert-v5 ... ppo_atari train
0.95
15094
MsPacman
slm-lab run -s env=ALE/MsPacman-v5 ... ppo_atari_lam85 train
0.85
2372
Breakout
slm-lab run -s env=ALE/Breakout-v5 ... ppo_atari_lam70 train
0.70
327
Lambda tuning: Different games benefit from different lambda values. See Atari Benchmark for optimal settings per game.
v5 vs v4 Difficulty: Gymnasium ALE v5 environments use sticky actions and stricter termination, making them harder than OpenAI Gym v4. Expect 10-40% lower scores.
Using Multiple GPUs
Automatic GPU Rotation
SLM Lab automatically cycles through available GPUs. With 4 sessions and 2 GPUs:
Session 0: GPU 0
Session 1: GPU 1
Session 2: GPU 0
Session 3: GPU 1
Using CUDA_OFFSET
For manual control when running multiple experiments:
Fractional GPU for Search Mode
In search mode, run multiple trials on one GPU using fractional allocation:
gpu value
Trials per GPU
Use case
0.5
2
Large networks
0.25
4
Medium networks
0.125
8
Atari (recommended)
SLM Lab uses Ray Tune for resource allocation. Fractional GPU means trials share the GPU via time-slicing, not memory partitioning.
GPU Memory Tips
Out of Memory Errors
If you hit GPU memory limits:
Reduce
minibatch_size- Most direct impact on memory (default: 256 for Atari, 64 for MuJoCo)Reduce
num_envs- Fewer parallel environments = smaller batch buffers (default: 16)Use larger
gpufraction - In search mode, usegpu: 0.25orgpu: 0.5to run fewer concurrent trials
Estimating Memory Usage
For the default Atari spec (minibatch_size=256, num_envs=16):
Model weights: ~7 MB (1.7M params × 4 bytes)
Gradients: ~7 MB
Batch data: ~50 MB (256 × 84 × 84 × 4 frames)
Overhead: ~100-200 MB (CUDA context, buffers)
Total: ~300-500 MB per training session
This is why entry-level GPUs work well—even with 8 parallel search trials, total usage stays under 4 GB.
Multi-session training: With max_session=4, sessions run sequentially by default, so memory doesn't multiply. In search mode with gpu: 0.125, 8 trials share the GPU via time-slicing.
Last updated
Was this helpful?


